


Github和Gitee代码同步更新: https://github.com/PythonWebProject/Django_Fresh_Ecommerce; https://gitee.com/Python_Web_Project/Django_Fresh_Ecommerce。
一、viewsets实现商品详情页
商品详情页效果如下:
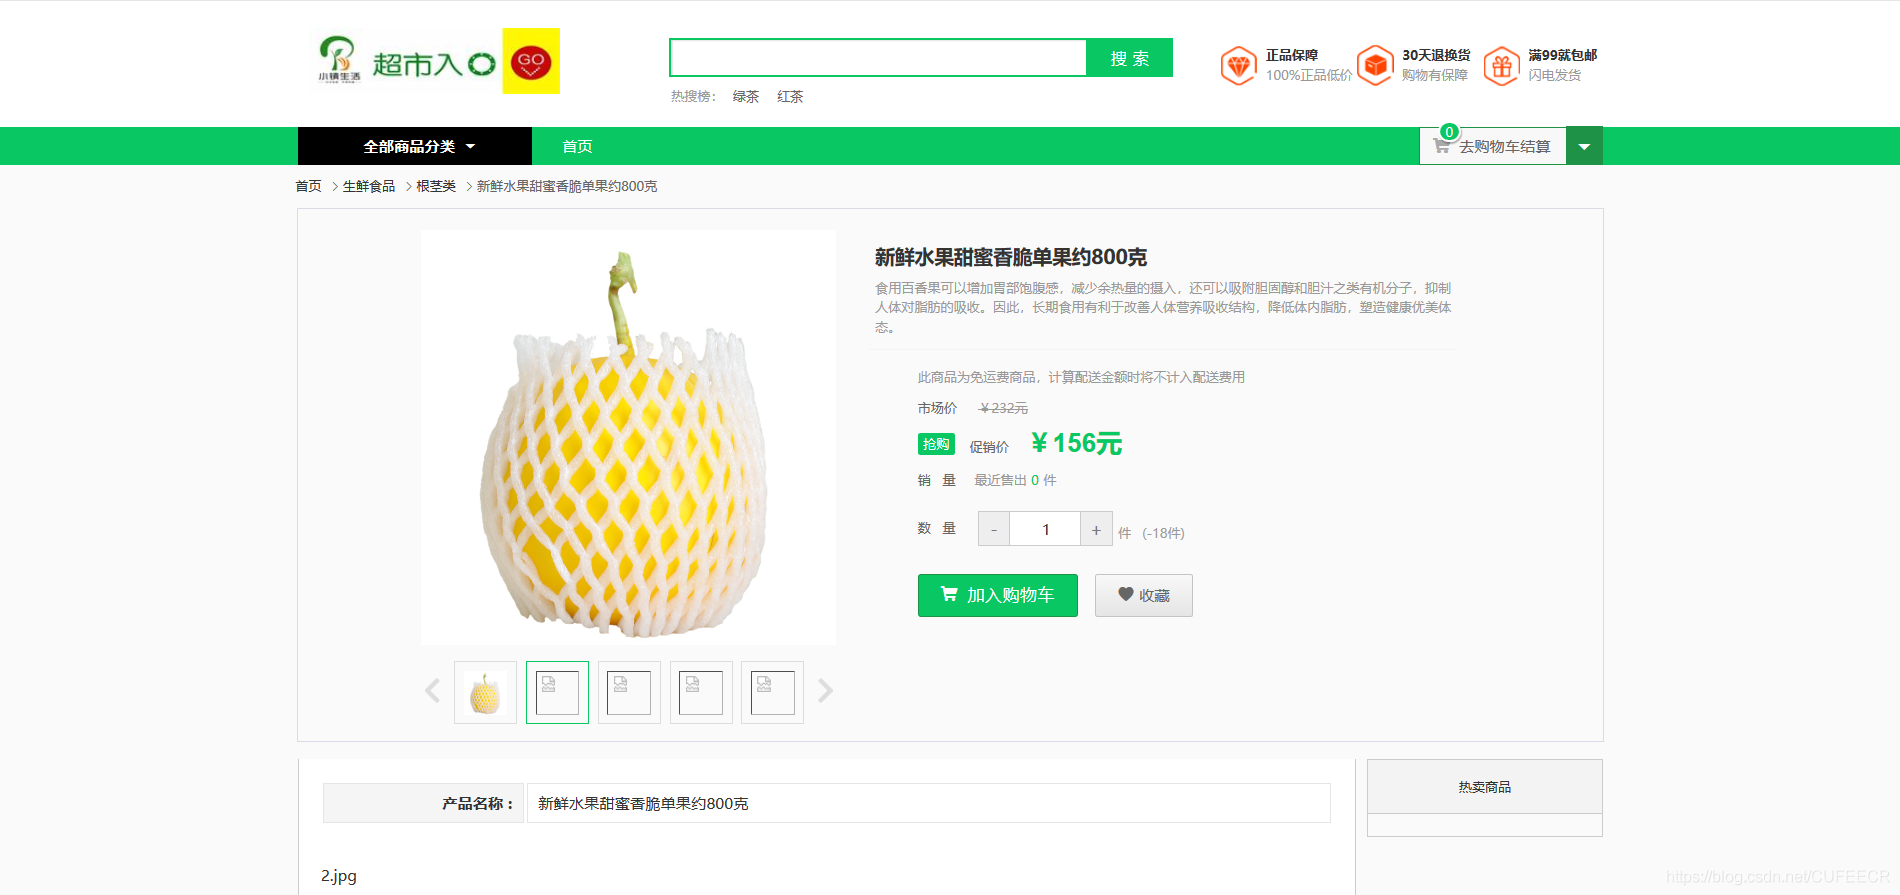
可以看到,左侧有商品轮播图,右侧是商品的详情信息,包括商品名称、商品描述、是否包邮、市场价、本店价、销量、库存量、购物车按钮、收藏按钮,还包括富文本详情和热卖商品等。
apps/goods/serializers.py中完善商品序列化如下:
class GoodsImageSerializer(serializers.Serializer): class Meta: model = GoodsImage fields = ('images', ) class GoodsSerializer(serializers.ModelSerializer): '''商品序列化''' category = CategorySerializer() images = GoodsImageSerializer(many=True) class Meta: model = Goods fields = '__all__'
视图GoodsListViewSet只需要继承自mixins.RetrieveModelMixin即可,如下:
class GoodsListViewSet(mixins.ListModelMixin, mixins.RetrieveModelMixin, viewsets.GenericViewSet): '''商品列表页,并实现分页、搜索、过滤、排序''' queryset = Goods.objects.filter(is_delete=False).order_by('id') serializer_class = GoodsSerializer pagination_class = GoodsPagination filter_backends = [DjangoFilterBackend, filters.SearchFilter, filters.OrderingFilter] filter_class = GoodsFilter search_fields = ['name', 'goods_brief', 'goods_desc'] ordering_fields = ['sold_num', 'shop_price']
此时进行访问测试:
显然,在商品信息中增加了images字段,用于保存轮播图片。
再看前端,src/router/index.js中定义了访问路由如下:
{ path: 'productDetail/:productId', name: 'productDetail', component: productDetail, meta: { title: '商品详情', need_log: false } },
src/views/productDetail/productDetail.vue如下:
created () { this.productId = this.$route.params.productId; var productId = this.productId if(cookie.getCookie('token')){ getFav(productId).then((response)=> { this.hasFav = true }).catch(function (error) { console.log(error); }); } this.getDetails(); }, getDetails () { // 请求商品详情 getGoodsDetail(this.productId) .then((response)=> { console.log(response.data); this.proDetail = response.data; this.curShow = this.proDetail.images[0]; }).catch(function (error) { console.log(error); }); },
在created()中获取到传入的productId,并调用getGoodsDetail接口,api.js中定义了数据接口getGoodsDetail,修改如下:
//商品详情 export const getGoodsDetail = goodId => { return axios.get(`${local_host}/goods/${goodId}`+'/') }
显然,可以传入商品id访问数据。
再次进行测试如下:
显然,可以正常访问本地数据并显示到前端。
还可以在后台给商品添加轮播图,可以选择上传本地图片和图片链接。
二、热卖商品实现
可以看到,在商品详情页右侧有热卖商品,这要用到商品的is_hot字段,在过滤器中对is_hot字段进行过滤即可,apps/goods/filters.py如下:
class GoodsFilter(django_filters.rest_framework.FilterSet): '''商品过滤类''' name = django_filters.CharFilter(field_name="name", lookup_expr='contains') pricemin = django_filters.NumberFilter(field_name="market_price", lookup_expr='gte') pricemax = django_filters.NumberFilter(field_name="market_price", lookup_expr='lte') top_category = django_filters.NumberFilter(method='top_category_filter') def top_category_filter(self, queryset, name, value): '''自定义过滤''' return queryset.filter(Q(category_id=value)|Q(category__parent_category_id=value)|Q(category__parent_category__parent_category_id=value)) class Meta: model = Goods fields = ['name', 'pricemin', 'pricemax', 'is_hot']
后端接口测试如下:
再进行前端配置,在src/views/productDetial/hotSales.vue可以看到:
created () { this.getHotSales(); }, methods: { getHotSales() { //请求热卖商品 getGoods({ is_hot:true }) .then((response)=> { console.log(response.data) this.hotProduct = response.data.results; }).catch(function (error) { console.log(error); }); } }
调用了getHotSales()方法,再调用getGoods()方法,同时传入is_hot参数。
先手动设置几个商品为热销商品,然后再次访问,可以看到:

热销商品已经显示出来。
三、用户收藏功能实现
1.用户收藏接口实现
用户收藏属于用户操作,所以在apps/user_operation中实现。
先在apps/user_operation下创建serializers.py如下:
from rest_framework import serializers from .models import UserFav class UserFavSerializer(serializers.ModelSerializer): user = serializers.HiddenField(default=serializers.CurrentUserDefault()) class Meta: model = UserFav fields = ['id', 'user', 'goods']
因为添加收藏是添加指定商品和当前用户到收藏,所以需要获取当前用户,而CurrentUserDefault即表示当前用户的默认类,用于覆盖原字段。
再在apps/user_operation/views.py中实现视图:
from django.shortcuts import render from rest_framework import viewsets, mixins from .models import UserFav from .serializers import UserFavSerializer # Create your views here. class UserFavViewSet(mixins.CreateModelMixin, mixins.ListModelMixin, mixins.DestroyModelMixin, viewsets.GenericViewSet): '''用户收藏''' queryset = UserFav.objects.filter(is_delete=False) serializer_class = UserFavSerializer
UserFavViewSet继承自CreateModelMixin,所以可以添加收藏,继承自ListModelMixin,所以可以列举收藏,继承自DestroyModelMixin,所以可以删除收藏。
再将其注册到urls.py中:
# 配置收藏路由 router.register(r'userfavs', UserFavViewSet, basename='userfavs')
示意如下:
 此时可以成功添加收藏,为了验证,查询数据库如下:
+----+----------------------------+-----------+----------+---------+ | id | add_time | is_delete | goods_id | user_id | +----+----------------------------+-----------+----------+---------+ | 1 | 2020-07-29 17:02:39.893993 | 0 | 25 | 1 | | 2 | 2020-07-29 17:02:49.268221 | 0 | 15 | 1 | | 3 | 2020-07-29 17:02:57.410071 | 0 | 5 | 1 | +----+----------------------------+-----------+----------+---------+ 5 rows in set (0.01 sec)
现在进一步实现删除收藏,需要用到HTTP中的delete方法,演示如下:
 可以看到,第一次DELETE请求时未返回信息,说明删除成功,第二次再执行则返回
未找到,再次印证删除成功。
同时还需要对收藏进行限制,即同一用户对同一商品只能收藏一次,需要在模型中进行设置,apps/user_operation/models.py如下:
class UserFav(models.Model): '''用户收藏''' user = models.ForeignKey(User, verbose_name='用户', null=True, on_delete=models.SET_NULL) goods = models.ForeignKey(Goods, verbose_name='商品', null=True, on_delete=models.SET_NULL) add_time = models.DateTimeField(default=datetime.now, verbose_name=u'添加时间') is_delete = models.BooleanField(default=False, verbose_name='是否删除') class Meta: verbose_name = '用户收藏' verbose_name_plural = verbose_name # 联合唯一验证 unique_together = ('user', 'goods') def __str__(self): return self.user.name
修改后需要进行数据库映射。
还可以在serializers.py中进行验证:
from rest_framework import serializers from rest_framework.validators import UniqueTogetherValidator from .models import UserFav class UserFavSerializer(serializers.ModelSerializer): user = serializers.HiddenField(default=serializers.CurrentUserDefault()) class Meta: model = UserFav fields = ['id', 'user', 'goods'] validators = [ UniqueTogetherValidator( queryset=UserFav.objects.filter(is_delete=False), fields=['user', 'goods'], message='请勿重复收藏' ) ]
演示如下:

可以看到,当已经存在收藏时再重复添加,就会返回non_field_errors错误,是在两个及以上字段联合验证失败时返回错误信息的关键字段,前端在接收后可以进行相应处理。
2.DRF权限验证
通常,仅进行身份验证或标识不足以获取信息或代码。为此,请求访问的实体必须具有授权。权限与身份验证和限制一起,确定是否应准予请求访问或拒绝访问。权限检查始终在视图的开始处运行,然后再允许执行其他任何代码,通常会使用request.user和request.auth属性中的身份验证信息来确定是否应允许传入请求。 权限用于授予或拒绝不同类别的用户对API不同部分的访问,最简单的许可方式是允许访问任何经过身份验证的用户,并拒绝访问任何未经身份验证的用户。常见的权限包括AllowAny、IsAuthenticated、IsAdminUser等。
现在需要进一步实现权限验证,限制用户只能操作自己的收藏等数据,这里选择IsAuthenticated,这是用来判断是否已经登录的,同时需要自定义权限来判断要删除的收藏记录对用的用户是否是当前的用户。
先在apps/utils中自定义所有者权限,permissions.py如下:
from rest_framework import permissions class IsOwnerOrReadOnly(permissions.BasePermission): '''对象级别的权限,仅允许对象的所有者对其进行编辑''' def has_object_permission(self, request, view, obj): if request.method in permissions.SAFE_METHODS: return True return obj.user == request.user
因为之前一直是在settings.py中定义了JSONWebTokenAuthentication认证,如下:
# DRF配置 REST_FRAMEWORK = { 'DEFAULT_FILTER_BACKENDS': ['django_filters.rest_framework.DjangoFilterBackend'], 'DEFAULT_AUTHENTICATION_CLASSES': [ 'rest_framework.authentication.BasicAuthentication', 'rest_framework.authentication.SessionAuthentication', 'rest_framework_jwt.authentication.JSONWebTokenAuthentication' ] }
属于全局设置,因此对所有的数据接口均需要认证才能成功,但是有的数据比如商品数据应该公开、而不应该认证成功后再访问,所以不能全局设置,而是在需要认证的app视图中局部定义认证即可,全局设置中去掉JSONWebTokenAuthentication认证,如下:
# DRF配置 REST_FRAMEWORK = { 'DEFAULT_FILTER_BACKENDS': ['django_filters.rest_framework.DjangoFilterBackend'], 'DEFAULT_AUTHENTICATION_CLASSES': [ 'rest_framework.authentication.BasicAuthentication', 'rest_framework.authentication.SessionAuthentication', ] }
views.py如下:
from rest_framework import viewsets, mixins from rest_framework.permissions import IsAuthenticated from rest_framework.authentication import SessionAuthentication from rest_framework_jwt.authentication import JSONWebTokenAuthentication from .models import UserFav from .serializers import UserFavSerializer from utils.permissions import IsOwnerOrReadOnly # Create your views here. class UserFavViewSet(mixins.CreateModelMixin, mixins.ListModelMixin, mixins.DestroyModelMixin, viewsets.GenericViewSet): '''用户收藏''' permission_classes = [IsAuthenticated, IsOwnerOrReadOnly] serializer_class = UserFavSerializer authentication_classes = [JSONWebTokenAuthentication, SessionAuthentication] def get_queryset(self): return UserFav.objects.filter(user=self.request.user, is_delete=False)
为了测试,在后台增加一些测试数据如下:
如果报错TypeError: __str__ returned non-string (type NoneType),直接在models.py中将UserFav的__str__()方法的返回值改为self.user.username即可。
数据如下:
+----+----------------------------+-----------+----------+---------+ | id | add_time | is_delete | goods_id | user_id | +----+----------------------------+-----------+----------+---------+ | 1 | 2020-07-29 17:02:39.893993 | 0 | 25 | 1 | | 2 | 2020-07-29 17:02:49.268221 | 0 | 15 | 1 | | 3 | 2020-07-29 17:02:57.410071 | 0 | 5 | 1 | | 6 | 2020-07-29 18:23:00.000000 | 0 | 3 | 1 | | 7 | 2020-07-29 18:23:00.000000 | 0 | 5 | 2 | | 8 | 2020-07-29 18:24:00.000000 | 0 | 26 | 4 | | 9 | 2020-07-29 18:24:00.000000 | 0 | 49 | 8 | +----+----------------------------+-----------+----------+---------+ 7 rows in set (0.00 sec)
可以发现,id为7-9的收藏不是admin用户所有,其他收藏为admin用户所有。
现进行测试如下:
可以看到,先在DRF后台增加收藏,然后在Postman中模拟访问获取到JWT后再删除,显然,只能删除用户自己的收藏,而不能删除其他用户的收藏。
3.前端Vue实现收藏功能
GenericAPIView有一个属性为lookup_field,用于执行单个模型实例的对象查找的模型字段,即查询单一数据库对象时使用的条件字段,默认为pk,即主键。可以根据需要进行自定义设置。
这里将UserFavViewSet的lookup_fields属性设置为goods_id,如下:
class UserFavViewSet(mixins.CreateModelMixin, mixins.ListModelMixin, mixins.DestroyModelMixin, viewsets.GenericViewSet): '''用户收藏''' permission_classes = [IsAuthenticated, IsOwnerOrReadOnly] serializer_class = UserFavSerializer authentication_classes = [JSONWebTokenAuthentication, SessionAuthentication] lookup_field = 'goods_id' def get_queryset(self): return UserFav.objects.filter(user=self.request.user, is_delete=False)
这样在数据接口中就可以直接传入商品id并根据该字段进行查询,而不再是根据UserFav的主键id进行查找,就到了自己设置查询使用字段的目的,可用性更高。
对于前端,productDetail.vue如下:
<a v-if="hasFav" id="fav-btn" class="graybtn" @click="deleteCollect"> <i class="iconfont"></i>已收藏</a> <a v-else class="graybtn" @click="addCollect"> <i class="iconfont"></i>收藏</a> created () { this.productId = this.$route.params.productId; var productId = this.productId if(cookie.getCookie('token')){ getFav(productId).then((response)=> { this.hasFav = true }).catch(function (error) { console.log(error); }); } this.getDetails(); }, addCollect () { //加入收藏 addFav({ goods: this.productId }).then((response)=> { console.log(response.data); this.hasFav = true alert('已成功加入收藏夹'); }).catch(function (error) { console.log(error); }); }, deleteCollect () { //删除收藏 delFav(this.productId).then((response)=> { console.log(response.data); this.hasFav = false }).catch(function (error) { console.log(error); }); },
created()方法调用了getFav(productId)接口,在登录的状态下如果已收藏就会显示已收藏,再点击就会取消收藏,deleteCollec()方法会调用delFav(productId)接口;否则显示收藏,点击可以添加收藏,addCollect()方法会调用addFav(productId)接口。在api.js中这些接口修改如下:
/收藏 export const addFav = params => { return axios.post(`${local_host}/userfavs/`, params) } //取消收藏 export const delFav = goodsId => { return axios.delete(`${local_host}/userfavs/`+goodsId+'/') } //判断是否收藏 export const getFav = goodsId => { return axios.get(`${local_host}/userfavs/`+goodsId+'/') }
现进行测试如下:
 显然,已经实现收藏的功能。